
This week, we’re raising money for charity: water! Not only is it a fantastic charity that supplies one of the most important resources on the planet, it’s one of the first charities I researched, long before I started streaming. About a month ago, I was invited by Anthony at charity: water and honestly, was thrilled, thankful and shocked.
I wanted to create a pattern that really brought home the efforts that the folks at charity: water bring forth. A reversible ami that went from dirty to clean seemed perfect, but I wasn’t quite sure how to go about it. Turns out (Ha! Pun unintended) it’s not as complicated as I’d have expected.
I’m fortunate enough to live in a place where I have the resources available to not have to work very hard for access to water, and, for many people around the world, 785 million to be precise, that is an extreme luxury. For the cost of our monthly water bill (on a high month), we can supply 12 people with water for a year. A YEAR. It’s a donation that can absolutely change lives – long term. Not only does charity: water provide a lasting, sustainable access point to clean water, making that change brings education, income and an increase in health to everyone in that community. 100% of donations go to water projects. You can’t possibly go wrong with this!

Materials
- worsted weight yarn in blue
- worsted weight yarn in light brown
- yarn scraps in pink, black and white for details
- 3.5 mm hook
- yarn needle
- 12 mm safety eyes (x4)
- polyfil stuffing
- sewing thread (not mandatory, but helpful)
- sturdy scissors or wire cutters (to trim safety eye posts a bit)
Stitches
- magic circle (mc)
- single crochet (SC)
- increase (inc) two stitches in the same stitch
- decrease (dec) – bringing two stitches together
- slip stitch
Body (in light brown)
Rnd 1 – MC, sc x 4 (4)
Rnd 2 – (sc, inc) x 2 (6)
Rnd 3 – sc x 6 (6)
Rnd 4 – (sc x 2, inc) x 2 (8)
Rnd 5 – (sc x 3, inc) x 2 (10)
Rnd 6 – sc x 10 (10)
Rnd 7 – (sc x 4, inc) x 2 (12)
Rnd 8 – (sc x 5, inc) x 2 (14)
Rnd 9 – (sc x 6, inc) x 2 (16)
Rnd 10 – (sc x 7, inc) x 2 (18)
Rnd 11 – (sc x 5, inc) x 3 (21)
Rnd 12 – (sc x 6, inc) x 3 (24)
Rnd 13 – (sc x 7, inc) x 3 (27)
Rnd 14 – (sc x 8, inc) x 3 (30)
Rnd 15 – (sc x 4, inc) x 6 (36)
Rnd 16 – (sc x 5, inc) x 6 (42)
Rnd 17 – (sc x 6, inc) x 6 (48)
Rnd 18 – 23 – sc in each stitch (48) – 6 rows
Rnd 24 – (sc x 6, dec) x 6 (42)
Rnd 25 – (sc x 5, dec) x 6 (36)
Rnd 26 – (sc x 4, dec) x 6 (30)
FO and weave in ends.
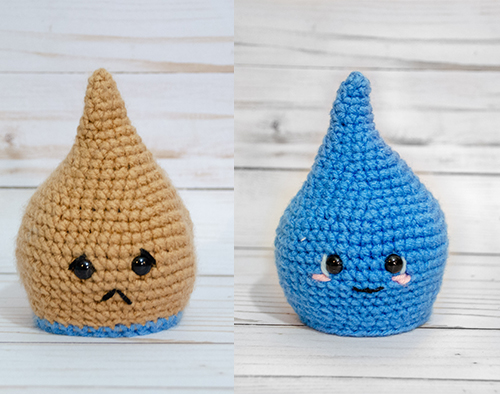
Outside Body (in blue)
Repeat the same steps for the brown body, but do not finish off. Place your eyes on each drop body (mine are between rows 18 and 19 , 4 stitches apart) and sew on the details for happy and sad faces. Once your eyes are nice and secure, you can trim the back of your safety eyes off. Make sure not to cut too close or they might come undone. I used wirecutters, but sturdy scissors should do the job. This step might not be completely necessary, but it does make flipping your friend a little easier.
The next bit is a little tricky. Turn your dirty drop inside out and place him inside your clean drop, with both faces on the same side (the inside (wrong sides) of each drop should be facing each other and you should be able to see the fronts of both eyes). Continuing with your blue yarn, sc in the last row of both the brown and blue drops to join them together. Slip stitch to the last stitch, FO and sew in your ends. To help with turning, you can also sew both of the tops of the drops together, just be careful not to sew it in a way that you can see the stitch. Sewing thread might be a useful tool here.
Voila! Now you can turn your little friend out. It takes a little elbow grease and if he looks a little wobbly, you can shape him. Since he has 2 layers of crochet, he will stand up on his own!
Hope your little drop makes you smile! Happy stitching!