
Every year we stream for two major charities – St. Jude and Extra Life. Both mean the world to me, but Extra Life, in particular, holds a special place in my heart. You can read a bit more about that here. This year marks my 4th year participating in EL and one of the ones where I get to do 2 campaigns!
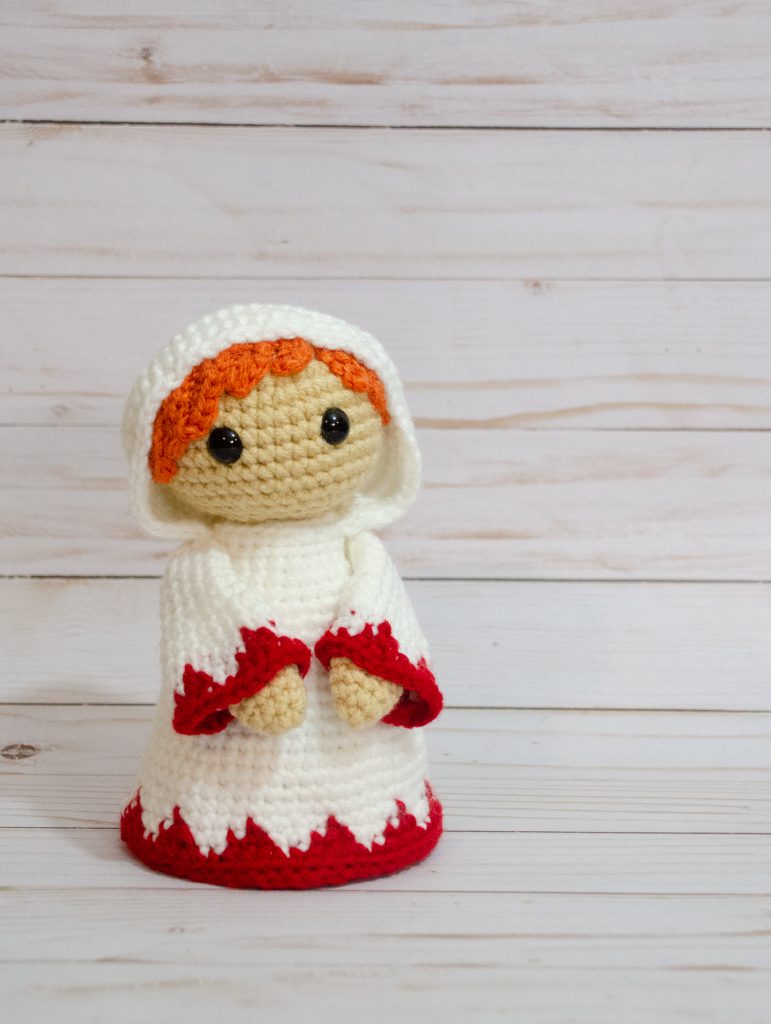
When we do hospital charity streams, we always pick an in game healer or healing item to crochet and make a pattern for. Our first was Chansey from Pokemon, but this year, we’re making a White Mage from Final Fantasy! I haven’t played much FF, and what I have was during our retro gaming stream a few years ago, but I really love how iconic these little healers are. I had a lot of fun designing the pattern during our Extra Life stream with Streamfluencer on Twitch. A few times a year, our community of streamers come together to raise money with 24/7 streams for a whole week! It’s always a wonderful experience and always means meeting new people for fantastic causes!
White Mage Pattern
Materials
- worsted weight yarn
white
red
skin tone
hair color - 3.5 mm hook
- yarn needle
- two 12mm safety eyes
- stuffing
- cardboard piece (optional)
Stitches
- magic circle (mc)
- SC – single crochet
- slip stitch
- decrease
- HDC – half double crochet
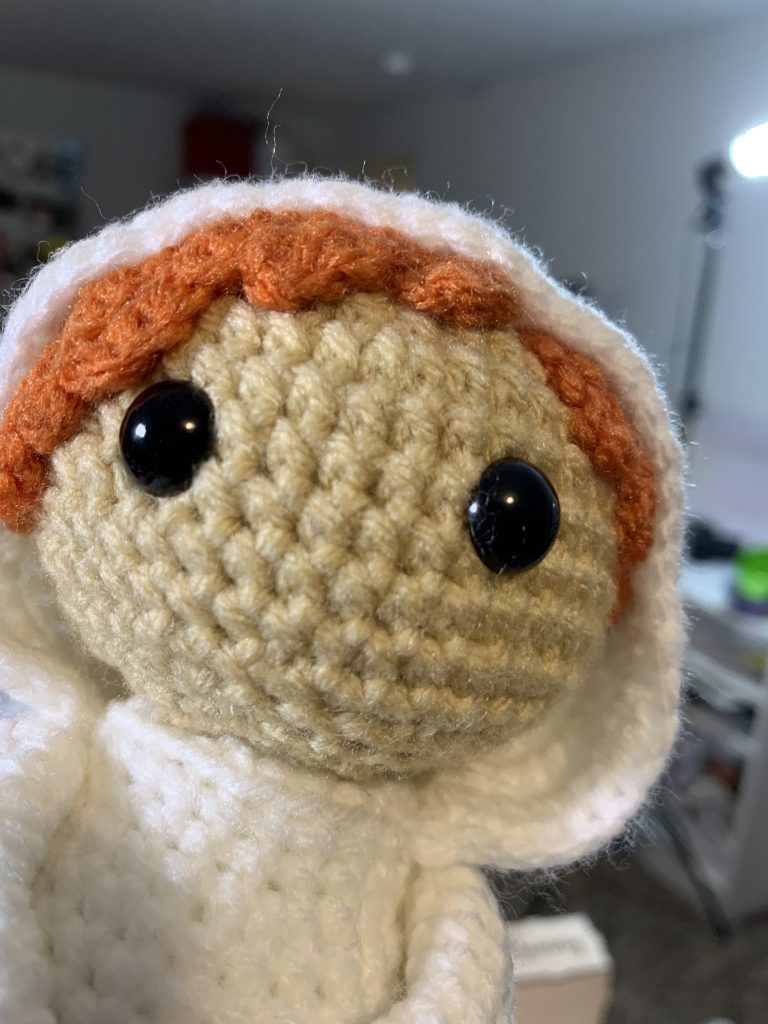
Head
In skin tone
Rnd 1 – MC, sc x 6 (6)
Rnd 2 – (inc) x 6 (12)
Rnd 3 – (sc, inc) x 6 (18)
Rnd 4 – (sc x 2, inc) x 6 (24)
Rnd 5 – (sc x 3, inc) x 6 (30)
Rnd 6 – (sc x 4, inc) x 6 (36)
Rnd 7 – (sc x 5, inc) x 6 (42)
Rnd 8 – 12 – sc in each stitch around (42)
I placed my eyes between rows 9 and 10, with 5 visible stitches in between them.
Rnd 13 – (sc x 5, dec) x 6 (36)
Rnd 14 – (sc x 4, dec) x 6 (30)
Rnd 15 – (sc x 3, dec) x 6 (24)
Rnd 16 – (sc x 2, dec) x 6 (18)
Rnd 17 – (sc, dec) x 6 (12)
Rnd 18 – (dec) x 6 (6)
FO and sew closed.
Body
In White
Rnd 1 – MC, sc x 6 (6)
Rnd 2 – (inc) x 6 (12)
Rnd 3 – (sc, inc) x 6 (18)
Rnd 4 – (sc x 2, inc) x 6 (24)
Rnd 5 – In back loops only – sc in each stitch. (24)
Rnd 6 – sc in each stitch around. (24)
Rnd 7 – (sc x 3, inc) x 6 (30)
Rnd 8 -10 – sc in each stitch around (30)
Rnd 11 – (sc x 4, inc) x 6 (36)
Rnd 12 – 14 – sc in each stitch around (36)
Rnd 15 – (sc x 5, inc) x 6 (42)
Rnd 16 -17 – sc in each stitch around (42)
Rnd 18 – (sc x 6, inc) x 6 (48)
Rnd 19-20 – sc in each stitch around (48)
Rnd 21 – (sc x 7, inc) x 6 (54)
Rnd 22 -23 – sc in each stitch around (54)
Rnd 24 – (sc x 8, inc) x 6 (60)
For the next 2 rows, we’ll be changing colors back and forth to create the triangle pattern at the bottom of the skirt. W will refer to the color white and R will refer to the color red.
Rnd 25 – W sc x 2, ( R sc, W sc x 4) x 11, R sc, W sc x 2 (60)
Rnd 26 – W sc, (R sc x 3, W sc x 2) x 11, R sc x 3, W sc (60)
Rnd 27 – In Red, sc in each stitch around. (60)
FO and tie in ends.
Bottom of Robes
In Red,
Rnd 1 – MC, sc x 6 (6)
Rnd 2 – (inc) x 6 (12)
Rnd 3 – (sc, inc) x 6 (18)
Rnd 4 – (sc x 2, inc) x 6 (24)
Rnd 5 – (sc x 3, inc) x 6 (30)
Rnd 6 – (sc x 4, inc) x 6 (36)
Rnd 7 – (sc x 5, inc) x 6 (42)
Rnd 8 – (sc x 6, inc) x 6 (48)
Rnd 9 – (sc x 7, inc) x 6 (54)
Rnd 10 – (sc x 8, inc) x 6 (60)
FO with tail to sew to base. I also put a little cardboard circle inside the bottom of the robes to keep it nice and flat at the bottom. Bonus points – it gives the base a nice, fixed bell shape.
Hood
In White
Rnd 1 – MC, sc x 3 (3)
Rnd 2 – sc x 3 (3)
Rnd 3 – (inc) x 3 (9)
Rnd 4 – (sc x 2, inc) x 3 (12)
Rnd 5 – (sc, inc) x 6 (18)
Rnd 6 – (sc x 2, inc) x 6 (24)
Rnd 7 – (sc x 3, inc) x 6 (30)
Rnd 8 – (sc x 4, inc) x 6 (36)
Rnd 9 – (sc x 5, inc) x 6 (40)
Rnd 10-11 – sc in each stitch around (40)
Rnd 12 – (sc x 6, inc) x 6 (48)
Rnd 13 – sc x 42. Ch. 1, turn. (42)
Rnd 14 -16 – sc x 36 Ch. 1, turn. (36)
Rnd 17 – HDC x 8, sc x 20, HDC x 8 (36)
FO with tail to sew to body
Sleeves (make 2)
In white
Rnd 1 – mc, sc x 6 (6)
Rnd 2 – (inc) x 6 (12)
Rnd 3 – 7 – sc in each stitch around (12)
Rnd 8 – (sc, inc) x 6 (18)
Rnd 9 – sc in each stitch around (18)
Rnd 10 – (sc x 8, inc) x2 (20)
For the next 2 rows, we’ll be changing colors back and forth to create the triangle pattern at the bottom of the sleeves. W will refer to the color white and R will refer to the color red.
Rnd 11 – W sc x 2, ( R sc, W sc x 4) x 3, R sc, W sc x 2 (20)
Rnd 12 – W sc, (R sc x 3, W sc x 2) x 3, R sc x 3, W sc (20)
Rnd 13 – In all red – (sc x 3, inc) x 5 (25)
FO and tie in ends
Hands (make 2)
In skin tone
Rnd 1 – MC, sc x 6 (6)
Rnd 2 – (sc, inc) x 6 (12)
Rnd 3 – 5 – sc in each stitch around
FO and sew your hands into your sleeves. Make sure to be careful on where you stitch and with what color (red in the red triangles, white in the white areas) so that your stitches aren’t visible on the sleeves themselves.
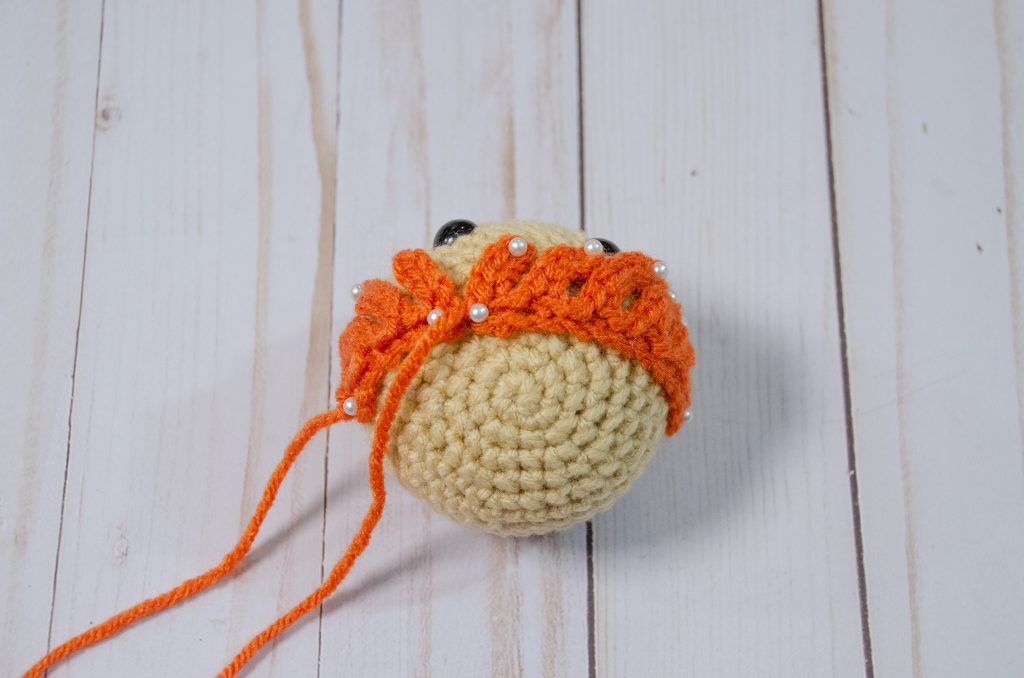
Hair Pieces
In hair color
Ch 7. Sl St into the 2nd chain from the hook. Ch 4. Sl St back along the chain to the main piece. Sl St into the next chain, Ch 6, Sl St back again. Sl st into the next chain, Ch. 5, sl st back. Sl st into the next chain. Ch 4, slip stitch back.
Ch 12. Sl St into the 2nd chain from the hook. Ch 5, slip stitch back to the base, sl st into the next stitch. Ch 6, sl st back to the base and into the next stitch. Ch 7. Sl st back to the base and then into the next stitch. Ch. 5. Sl st back to the base and into the next stitch. Ch 4. Sl st back to the base and into the next stitch. Ch 4. Sl st back to the base and into the next stitch.
Assembly Notes
My assembly order started with stuffing the base, then sewing on the bottom with the cardboard insert (noted above). Next was attaching the hair, which I sewed along the base chain, but also to the ends of each strand to make sure they stayed in place. Then I sewed the hood along the hair line, making sure not to pull the stitches so tight that the cloth looked bumpy, but not so loose that you could see the stitches either. Then I sewed the head itself to the top of the base robes, then the hood to the front loops of row 5 of the body. The back of the hood should look a little gathered, like cloth. You can also sew down the little curve of the hood at the back so that it stays folded.
After that, you can sew the hands inside the sleeves and then the sleeves to the body in any position you’d like. I wanted them resting at the front for now, but you could also make a little staff and position your mage holding it.
Overall, I really loved creating this pattern and, for the most part, it was pretty quick. We finished the main design in a 4 hour stream and the rest was finishing up the pieces and sewing. I’m really happy with how she came out and thrilled to add another healer to our deck!
Thanks for hanging out with us! Hope you love your own little mage as much as I love mine!
#ForTheKids
Don’t forget that you can donate to our Extra Life campaign here if you’d like to send support and you can join our team as well! ANY donation amount given will get you a PDF copy of this pattern via email!
Happy Stitching! And Happy Extra Life Season!